
Virtual IP address configuration page in pfSense.
A virtual IP address (VIP or VIPA) is an IP address that is not assigned to a specific single server or network interface card (NIC). Rather, it is assigned to multiple applications on a single server, multiple domain names, or multiple servers. Normally, a server IP address depends on the MAC address of the attached NIC, and only one logical IP may be assigned per card. However, VIP addressing enables hosting for several different applications and virtual appliances on a server with only one logical IP address. VIPs have several variations and implementations, including Common Address Redundancy Protocol (CARP) and Proxy Address Resolution Protocol (Proxy ARP).
pfSense Virtual IP Addresses: Proxy ARP
pfSense allows four types of virtual IP addresses: Proxy ARP, CARP, Other, and IP Alias. In this article, I will cover how to configure pfSense virtual IP addresses using Proxy ARP and CARP.
The different types of virtual IP addresses have slightly varied properties. With proxy ARP, the properties are:
- Can only be forwarded by the firewall (cannot be used by the firewall)
- Uses Layer 2 (the data link layer) traffic
- Can be in a different subnet than the interface
- Cannot respond to pings
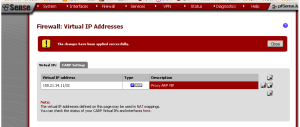
Once the Virtual IP has been entered and saved, it is added to the list.
To configure a Proxy ARP virtual IP address, browse to Firewall -> Virtual IPs and Click the “plus” button to add a new virtual IP address. At type, there are four radio buttons; select the radio button for “Proxy ARP” (it should be the default selection). For “Interface”, select “WAN”. At “IP Address(es)“, select “Single address” for “Type” (this should be the default). At “Address“, specify an IP address. At “Description“, enter a description if desired. Then press “Save” to save the changes and “Apply changes” to apply changes if necessary.
Now, the newly-created VIP should be listed at the “Virtual IPs” tab at Firewall -> Virtual IPs.
pfSense Virtual IP Addresses: CARP
You can also configure a virtual IP with CARP in pfSense 2.0. The properties for a CARP VIP include:
- Can be used or forwarded by the firewall
- Uses Layer 2 (data link layer) traffic
- Should be used in firewall fail-over or load-balancing scenarios
- Must be in the same subnet as the interface
- Will respond to pings if configured properly
To set up a CARP virtual IP address, browse to Firewall -> Virtual IPs and click the “plus” button to add a new virtual IP address. At “Type“, select the “CARP” radio button, and at “Interface“, select “WAN” (it should be the default). At “IP address(es)“, specify an IP address. At “Virtual IP Password“, specify a password. At “VHID Group“, choose a group. At “Advertising Frequency“, select a frequency (0 for master). At “Description“, add a description if desired. Then press “Save” to save the changes and “Apply changes” to apply the changes if necessary.
In part two of this series, I will cover setting up virtual IP addresses with IP Alias and Other types.
Once again, the “Virtual IPs” tab under Firewall -> Virtual IPs should display the newly-created VIP within the list of pfSense virtual IP addresses. In part two, I will cover IP aliases (new to pfSense 2.0) and other VIPs.
External Links:
What are Virtual IP Addresses? at doc.pfsense.org
The post pfSense Virtual IP Addresses: Part One appeared first on pfSense Setup HQ.